When drilling into glass tiles, water-cooled diamond encrusted bits, run at a relatively slow speed.
Using coring bits
To make large holes that can accommodate pipes and larger fittings use a diamond coring bit. Made from electroplated steel, and encrusted with diamond dust, they are attached to a hand drill or drill press and cooled with water.
Water cooling is essential. For the professional installer, a water jacket - a drill fitting with a water valve - is a good investment for cooling the drill bit. If you have only a few cuts to make, you can make do by creating a dam around the tile. Use a good putty - such as glazier's putty - to encircle the target, then fill it with water. Always drill at a slow speed to prevent wear and tear.
Smaller holes
Use a carbide drill bit on small holes. If you need to drill smaller holes, and the tiles have not already been set, use a standard carbide tipped glass bit. Hold the drill to stand perpendicular to the tile. If the drill and glass tile can't be securely clamped in place, begin by drilling a very small pilot hole through the glass to act as a guide.
Keep the drill bit and hole lubricated with turpentine or water and operate at a low speed. To reduce the risk of chipping around the exit edges of the cut, drill part way through from one side then complete the cut from the other side.
Drilling to accommodate anchored fixtures
If you are drill to accommodate anchored fixtures, first make a hole in the glass tile that is 1/8" (3mm) wider than the anchoring screws. When the tile has been installed, this extra space will allow you to apply the anchoring screws without touching the tile. This will prevent stresses from transferring from the substrate, through the anchor, and into the tile. Anchors should be well secured to the structure, and the fixture should not rest on the tile.
Wear protective eye wear when drilling tile. Information on these pages is offered as a background and guideline. No warranty is implied. Always check with your manufacturer for a methodology that they will stand behind.

1
Glass can chip or break if it is not drilled properly.
The keys to success are a high quality diamond bit, plenty of water for lubrication, and slow drill speed.
2
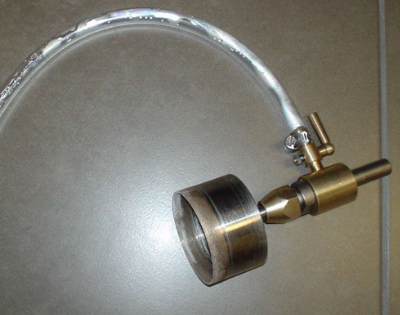
A specialized water jacket is a great tool for professionals.
It enables a steady stream of water to cool the drill bit, ensuring long blade life and a smooth cut.

3
An alternative to a water jacket is to improvise a water dam using a clay like glazier's putty.

4
Pictured is a coring bit attached to a water jacket, which in turn has been connected to a water source. A drill press ensures a straight, perpendicular cut.

5
Clamp the tile down before cutting and drill at a slow speed.

6
A glass emulsion is released as the coring bit penetrates the tile.

7
When finished, tap the coring bit to release the cored piece.